How to Fix Driver Wudfrd Failed to Load in Windows 10: The driver WUDFRd Failed to Load issue emerges when the drivers on your PC are inconsistent with the operating system. Many individuals observe this mistake while moving up to Windows 10 or while refreshing the Windows rendition. This is on the grounds that when you update to Windows 10 laptop your drivers are overwritten by Microsoft drivers which causes contention and subsequently the mistake.
Here, we give you a simple answer to this issue. Peruse all techniques cautiously to figure out how to fix the driver Wudfrd Failed to Load the device.
Covered Topics
What is the WudfRd driver?
WudfRd.sys is one of the proper Windows drivers for communication between your PC and hardware or appended devices. A little piece of programming has direct admittance to the hardware, the inner parts of the operating system, etc. Furthermore, utilizing the free file information gathering, you can decide whether WudfRd.sys is a Windows system file or has a place with a PC. trust application.
How to Fix WudfRd Driver Driver Could not Load the Problem?
Here are some ways to resolve the WudfRd error due to incompatible drivers. However, be sure to make a full backup of all important files and data in case of problems.
1. Manually Search Windows Update
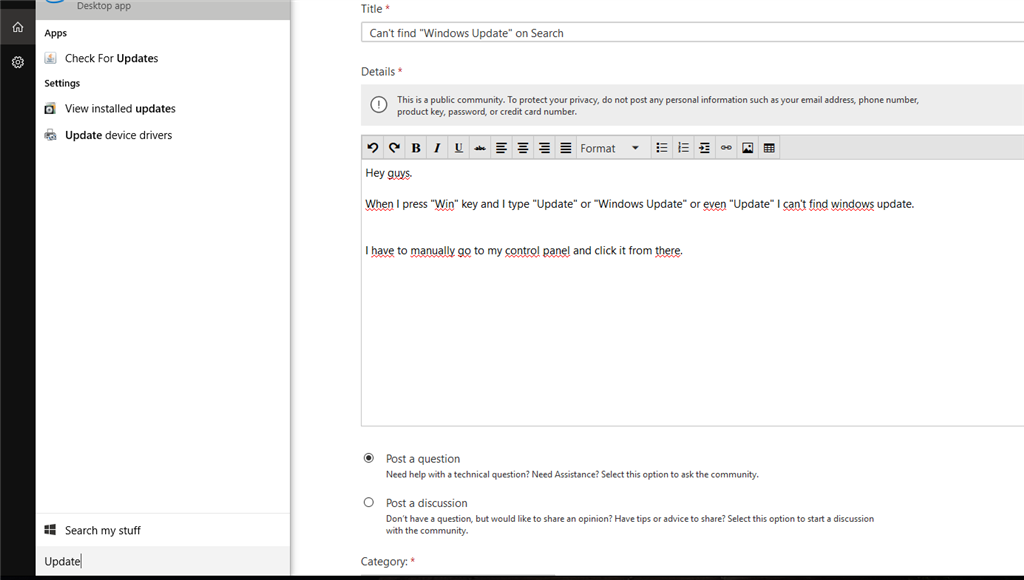
The first and least difficult answer for fixing the WudfRd driver that has Failed to Load Windows 10 is to check to assume that your working system is forward-thinking. The Windows Update area likewise incorporates refreshes for gadget drivers. Check them physically to take care of the issue.
- Type “Update” in the Cortana search box and press Enter. Or on the other hand, you can open your system settings by squeezing the Windows + I symbol key. Then, click Update and Security.
- Now, click the Check for Updates choice. Check to assume there are any updates holding back to download.
- Update the expected drivers, then, at that point, reboot your system in the wake of introducing the most recent drivers.
2. Update Incompatible Drivers
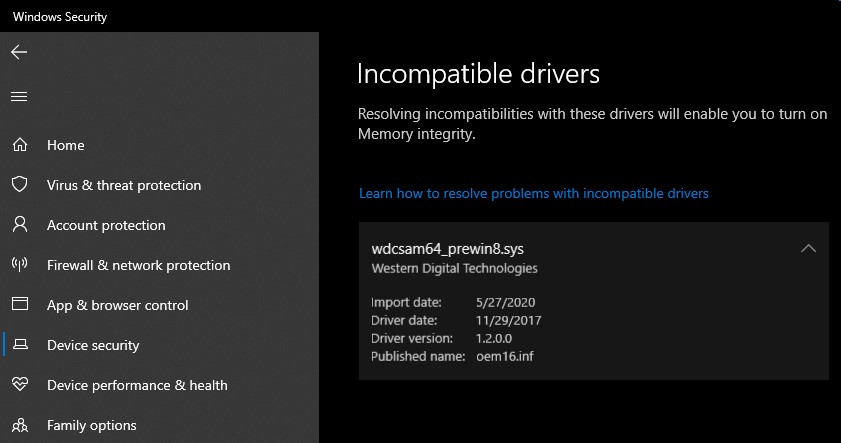
After updating your system to Windows 10, you might track down the 219 blunder. Subsequently, by refreshing the incongruent drivers, you will actually want to check to assume the issue is settled. Search for old drivers in Device Manager.
- Click the Windows + X symbol button. Then, at that point, click the Device Manager to open it.
- Now search for a yellow interjection point on the device drivers. These drivers are the conflicting ones.
- Update the outdated drivers physically or utilize the assistance of driver fix devices like the IObit driver. Apparatuses like this assist you with refreshing contrary drivers effectively and rapidly.
- Download and introduce the most recent driver from the producer’s site or utilize the programmed instruments to take care of such issues.
3. Reinstall USB Controllers

General sequential bus errors, otherwise called USB, are stacking mistakes from WudfRd for the ACPI device. One more likely answer for the issue is in this manner the reinstallation of the USB drivers. This is the way you can get it done.
- Simultaneously press the Windows + X keys. This will open the menu and pick Device Manager.
- The Device Manager window will open. Grow the USB Controllers choice by double-tapping it.
- Right-click every device recorded under the Universal Bus Controllers choice. Then, at that point, click on the uninstall choice.
- Press Enter or click OK. Restart/reboot your system.
That’s it in a nutshell. The USB controllers will be consequently reinstalled by the Windows working system. After this check, regardless of whether the issue has been settled.
4. Enable Windows Driver Foundation Service
- Open the Run window by squeezing Windows + R button. Type “administrations. MSC” in the exchange and snap OK.
- Presently, track down Windows Driver Foundation – User-mode Driver Framework administration and afterward right-click on it to choose the Properties choice.
- Under the General tab, set the startup type to Automatic and ensure the help status is running. In the event that it’s not running, click the Start button to empower the assistance.
- Click Apply and afterward the OK button to save changes.
- Reboot your PC to check whether driver WUDFRd Failed issue actually continues to happen.
5. Disable Hard Disk Hibernation
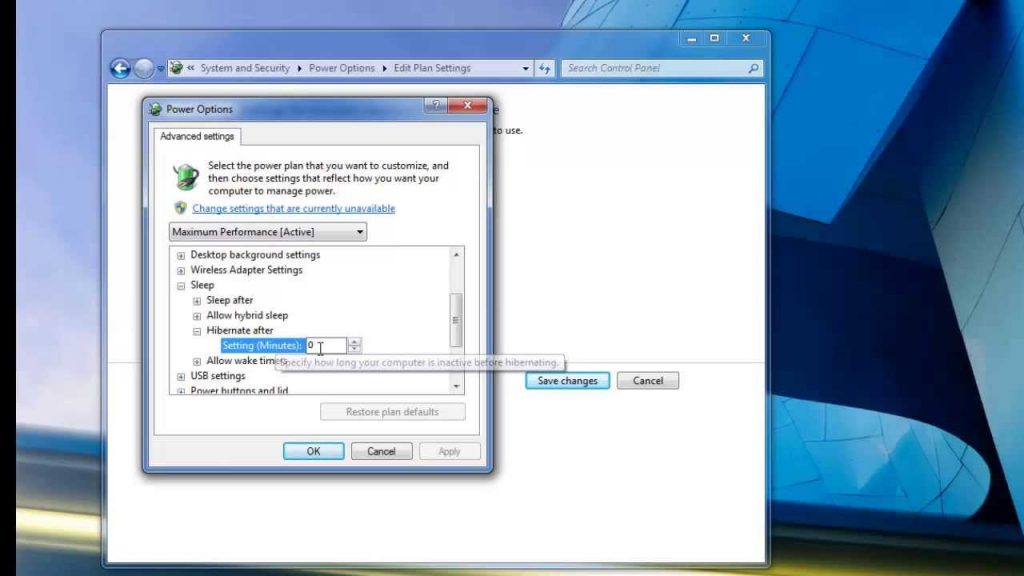
- Press Windows + X key and pick Power Options from the rundown.
- Presently, click on Additional power settings in the right sheet to open Control Panel.
- From that point forward, click Change plan settings for your current power plan
- Then, at that point, you should tap on the change progressed power settings.
- Grow the Hard disk and extend Turn off the hard disk later.
- Presently alter the setting for On battery and connected. Set Never for the two settings
- Select Apply and afterward OK to save changes.
- Presently, reboot your PC to check whether the Wudfrd failed to load issue happens
Conclusion
These are the best fixes for the WudfRd driver that failed to load the issue. Follow the given methods one by one and let us know which solution worked for you. One of these will definitely help you to fix the WudfRd error under Windows 10.